How do I update account balances and check progress over time?
Keeping your account balances current ensures your projections reflect your actual financial situation.
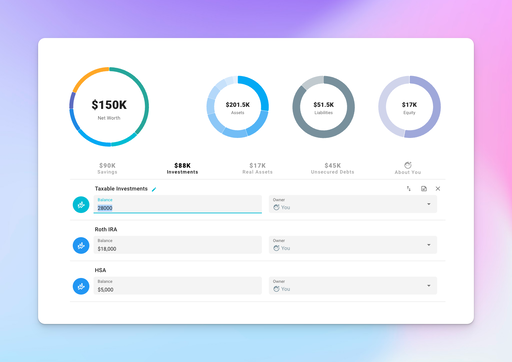
Manually updating balances
If you want to manually update these balances follow these 3 steps below:
- Go to the Current Finances screen by clicking the pie chart icon on the left side of your screen.
- Find the account you want to update from the following sections: Savings, Investments, Real Assets & Unsecured Debts and edit the balance directly.
- Repeat for any other accounts that have changed.
Standard plans will automatically inherit your updated balances. A progress point is also created each day you make updates, so you can track how your finances change over time.
If you’d prefer not to update manually, the Plugin System lets you pull in balances automatically from tools like You Need a Budget (YNAB), Lunch Money & Monarch Money – or build your own custom automations to other tools.
How updating account balances affects progress
Each time you make a change to your Current Finances it will automatically create a new Progress Point and add the date you made this change.
Adding Progress Points Automatically vs. Manually
On the left side of your screen go to the Progress icon, it looks like a line graph with sparkles > click Progress and you’ll see your Net Worth, along with a Progress graph over time.
Below, you will see Progress Points that are created automatically when you update your Current Finances. Each Progress Point will have your Net Worth, Assets & Liabilities.
If you don’t want Progress Points to be added automatically, click the three dot menu next to Progress Points > switch the toggle to the left to turn off Add Progress Points Automatically. The toggle switch will turn from green to grey to confirm it’s off. Want to turn it back on? Switch the toggle to the right and it will turn green to confirm it’s on.
If you want to edit or delete a Progress Point, go to the three dot menu next to each Progress Point on the right side of the screen > choose from Edit, Duplicate, or Delete.
- Edit - allows you to change a date or individual values of your accounts > click Save to save your changes
- Duplicate - allows you to make updates to a date or individual values of your accounts > click Save to save your changes
- Delete - allows you to delete a specific progress point > click Remove to officially delete the progress point
Related
Disclaimer: The content, tools, and resources on ProjectionLab.com are intended solely for informational and educational purposes and should not be construed as professional financial or investment advice. Our materials are designed to provide general guidance and are based on the input and data provided by users. ProjectionLab makes no guarantee of the accuracy, completeness, or applicability of this content to individual circumstances. Effective financial planning and investment involve comprehensive consideration of a wide array of personal financial factors. The tools and resources available on ProjectionLab are aimed at helping users develop an understanding of their financial trajectory. However, they should not be solely relied upon for creating a complete financial plan. We strongly recommend consulting a financial services professional who can provide personalized advice based on your unique financial situation before making any significant financial decisions. While we endeavor to keep the information on ProjectionLab current and accurate, the content may differ from that found on other financial institutions, service providers, or specific product sites. All content and tools on ProjectionLab are provided without any guarantees or warranties of any kind.